Hello all!
Nail school has been going well, except we’re in the dreaded Cuticle Zone. I hate having mine messed with. Interestingly enough, what I usually think of as the “cuticle” (that little border of skin on the sides of the nails) is not. The real cuticle is actually a thin film that grows over the nail and is invisible until you scrape it off (aargh, I die a thousand deaths!). It’s not at all painful, but I hate doing it on other people and *really* hate having it done. Especially by other students who are a bit overzealous with their pointy tools. Gaah. It gives me the heebie jeebies.
Just use a creme cuticle remover once or twice a week and moisturize your hands regularly and you won’t have to worry about it.
My nails are also 10 different shapes and lengths due to some enthusiastic student filing too. I expect they’ll look pretty bad for the duration of nail school, unfortunately. It’s just part of learning.
So, for now, I have a cool tutorial to show you while my poor nails recover.
Dotting tools are pretty cheap- you can find them on Ebay or in salon supply stores. They look like this:

They have little metal balls on the end in various shapes to make different size dots.
Put a drop or two of nail polish in a silicone baking cup or on a palette. Just a tiny bit is enough, since it will dry very quickly. You will need to use a fresh dab of polish every 30-45 seconds or so, because thick, partially-dry polish will not give you a nice clean dot.

Hold the dotting tool like a pen, dipping quickly and lightly.

Practice making dots in various sizes. The dotting tool works best when applied with thin, fresh polish with a light touch. Once the polish begins to thicken even slightly, it’s much harder to work with. Just add a new drop of polish to the palette.

Once you’ve got the hang of it and can make dots where you want them, you can make a heart! The heart is made with two big dots fairly close together. After doing the second dot, quickly drag the tool diagonally in a “v” shape to make the heart.

As you can see, the heart on the middle nail got a bit thick. I stopped to take a photo, so the polish thickened up in that time, so be careful! You can adjust the shape of the heart by how far apart you space the two dots and the angle of the “v” you draw at the end. Experiment and have fun!

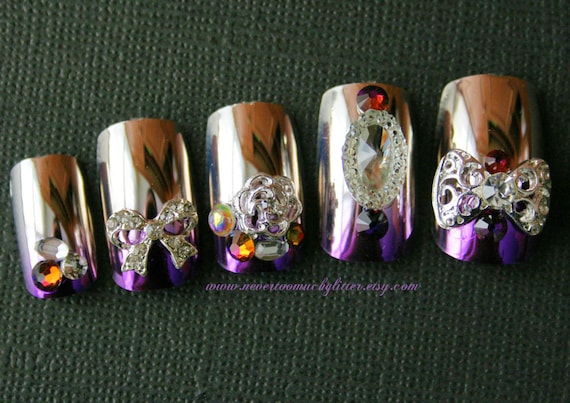
Bows are easy too- make big dots farther apart with the larger side of your dotting tool, add a dot in between, slightly lower than the other dots, then use the smaller end of the tool to create the ribbon ends- just do an upside down “v” shape.

Then add a rhinestone in the middle, or a contrasting color dot!

You can also do dot-within-dot using contrasting colors too!
It’s a fun and easy way to add an accent nail, or to jazz up a pedicure. Just remember that you need a new dab of polish the minute the previous one begins to thicken!

Thanks for the tips… I just got my dotting tools in the mail yesterday, and I can’t for my life decide on a mani to attempt! Maybe just fussing around to get used to them and get some inspiration is in order.
I’m glad the tutorial helped out! First up is just some practice to get the feel. Try some little scattered flowers or hearts here and there, or even jazz up a boring old French tip. Have fun! 🙂
Pingback: Some Quick and Easy DIY Valentine’s Nail Art Ideas | Nevertoomuchglitter's Weblog
Pingback: Fancy Finger Guns